Steps List: Wall Framing

I finally got around to finishing the section of my steps list about the walls!

If you’re interested in building your own tiny house, check out the step-by-step list I wish I had when I started:

Phase 3 (start on slide 10).

See the rest of my steps list and related posts by clicking on the “Steps List” tag in the sidebar. 🙂

The one difficulty I had was keeping the wood lined up while using the nail gun. A clamp by itself doesn’t have enough surface area. I used two metal plates clamped onto the top and bottom of the pieces I was nailing to keep them from slipping.

I spent 3.25 hours on clean-up, 50 hours on building the walls, and had help from family and friends for 22 hours (for the wall raising day and later adding blocking).

It only took me a weekend to build the two long walls, which was super encouraging. Building the walls was one of the easiest things I’ve done so far. I was able to do all of it (except the wall raising) by myself, and it’s pretty simple if you have detailed plans to just cut and nail everything together.

I can proudly say I designed my house myself, and it looks beautiful!

Progress Pictures

Who said I can’t lift plywood by myself? Well, I can. I just can’t lift it, hold it in place, and wield a nail gun while on a ladder all at the same time. So putting up the plywood has been a slow process because I’ve had to recruit help.

This is the first two sheets up, on the end and far wall, with more ready to go, and you can see the bathroom window is a missing a few pieces.

IMG_0904We got a couple more sheets up after fixing the window. Then I bumped my head on two different window sills twice in a row, so I was definitely ready to close up all the “doors” into the house and stop climbing through the walls.

More done! The sheets over the wheel wells, despite my careful measuring, still ended up being a pain, but they’re up!

We got the other side done while we were at it.

It’s so nice to stand inside! Every new step is exciting 🙂

The top couple of feet of plywood won’t go up until the rafters are on. On the sides I’ll need to notch out the plywood to fit up between the rafters.

Thank you to Dylan, Dan, Colby, Mitchell, and T.O.!

Note: I researched plywood orientation multiple times, and repeatedly found different reputable builders doing it either way, and most of the advice I found said that either works. I oriented the plywood however it was easiest, so on the side walls I put it up vertically to eliminate a set of blocking, and on the end walls it was easier for me to do the sheets horizontally. As for stamp in or out, if the stamp doesn’t specifically say, I found the same advice, either works and some people do it one way for this reason while others do the opposite way for another reason. I ended up putting my sheets, if they were bowed, so that the edges were touching the studs because I found it easier to push on the middle of a sheet than to fight to get the edges attached.

I had hoped to get the last few skinny sheets done on the front end of the house, but we ran out of time that day, and I have some news! I started a second job! So I’ve been working a lot and whenever I have a day off, it pours. I haven’t been able to work on the house unfortunately. I never realized how much it rains in Nova Scotia!

In between having help, I have been working on the rafters, often racing the clock before a shift, or racing the rain! There’s been at least twice where I’ve been working and have felt the rain start and had to run to get everything back into the garage.

It took six tries, but I finally made a promising rafter template:

I cut all my 2x10x6s in half to prepare to make them into rafters:

I cut all the ends to the correct angle (the four on the bottom of the pile are going to be a little different because they’ll be the face boards on the outside of the house):

And this is why I’m not allowed to cut in the garage:

It makes a mess!

It makes a mess!

In other news, I had someone stop by and knock on my door to ask about the tiny house! And not someone who was just curious, but someone else who is building a tiny house! Of course, they’re further along than I am, but that’s probably because they’re a professional builder who was commissioned to build the house. They offered me their tarp after their roof is on, and I’m gonna go stop by their build sometime soon!

Nightmares

Happy October! No, not really for me. I had a nightmare this morning that instead of plywood on the trailer, there were floor boards. The boards were all rotten and twisted, and I could pull them right off. And, between the cracks, I could see crystal clear water filling the trailer instead of insulation. Then a giant firecracker landed in my yard and bent the frame of the trailer beyond repair. It’s been raining a lot, and Dylan mentioned fireworks earlier…

I’ll back up a little. Since I posted last week, I finished the blocking:

I’m not afraid of heights, but being ten feet in the air with a nail gun is not fun. It looks a lot better without missing pieces though!

Here’s a pic. of the little wall we put in:

We finished drilling the hole in the trailer and attached the porch post:

That’ll get some black paint later.

That post won’t be going anywhere. Something I’d like to note: when I was researching how to attach my post and if it was structural or not, I learned that it depends how big your porch is. Tiny House Giant Journey didn’t put their post in until they found just the right one, but their porch is small. Mine is more than 24″ wide, so the upper walls need to be supported.

We got some plywood cut and ready to go up, but it’s easier to do with 3 or more people and our help for the day fell through. Dylan and I switched to working on rafters:

My lovely helper :)

My lovely helper 🙂

Looks perfect on the first try!

Looks perfect on the first try!

But that was deceiving. We tried the rafter on the other end and it wasn’t even close. Rather than making another incorrect rafter, I measured and lined up the rafter and some wood on a sheet of plywood and traced the rafter onto both halves. The angle is off a little, so I have to fix that.

My two part ridge board has been put together as well and is waiting to be put up. Another note: My design supports the roof through the loft support beams and some collar ties, so my ridge board is non-structural and is only there for ease of attaching my rafters. A 2×6 is not an adequate ridge beam. My engineer said I’d need a 12″ engineered beam (that would seriously cut into headroom), so I opted for the collar ties instead.

It’s not the progress I was hoping for during the sunny days that we had but it’s better than nothing. I was out there every clear day. I also did a little flooring research and have found a beautiful hand-scraped floor that’s on sale right now…

But it’s been pouring rain this week. There’s been a rainfall warning in effect, and they’ve been calling for up to 70mm in two days. I can’t wait until I can enjoy the rain without panicking about my house. I’m not too concerned about the frame getting wet, but worrying about the floor stresses me out. The floor is covered with two layers of tarp, but where the trailer is level now water has no where to go.

The first day of rain wasn’t too bad, only the edges of the floor got wet and the tarp did its job. But the second day the tarp was full of puddles and the floor underneath was soaked. I got out the shop vac for a little clean-up, but they’re still calling for more rain. Thank goodness I didn’t use OSB or fiberglass!

Note to aspiring tiny house builders: find an indoor place to build, or be prepared to stress about rain for months.

I’ve been asked if I think I’ll finish in time, and my answer to that is, I have no idea. But I’m doing my best.

Working Away

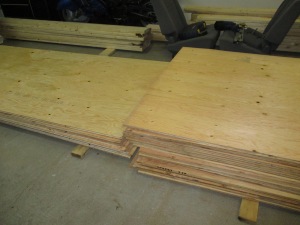
My plywood was delivered so now the garage is full again:

I ordered 1/2″ plywood for my wall sheathing, 5/8″ T&G plywood for the roof (eliminating the need for plywood clips, plus it was all they had), and the 2x6s for my rafters.

The other day I was out measuring all the gaps between the studs to cut blocking for the plywood. I ended up having to leave before being able to cut anything, and then later I was reading about blocking. I read that you should measure at the bottom or the top; that way a bowed board doesn’t mess you up. So I re-measured all the spaces at the bottom and then cut them all.

I also cut some extra studs to make my California corners and cut all the pieces for the small wall. Then today, I had Dylan and Dan over to help, and Tasha, Jordynn, and Megan were there to watch. 😛

The first thing we did was pick up some 12′ boards with the truck for my ridge board, which I had neglected to order with the plywood. Then we spent most of the day up on ladders. We did a bunch of little things that aren’t very visible. This was when we stopped for supper (after starting at noon):

And at the end of the day:

What we did:

  • nailed together the small wall (that goes beside the window seat) and put it in place
  • added the angled pieces around the wheel wells and put a few extra nails in a few places
  • nailed the corners together (no more clamps!)
  • added the extra studs in the corners to create a nailing surface for the interior siding
  • started drilling a bolt-sized hole in the trailer to secure the post (but it still needs to be drilled bigger)
  • drilled a shallow hole in the bottom of the post to accommodate the the bolt head
  • snapped chalk lines for the plywood
  • added blocking (except for above the windows)

My mistake: not accounting for the fact that the trimmer studs don’t continue above the windows, so I have a few too-short boards to re-make.

I don’t know how other people manage having friends over to help them with their builds. It’s hard to direct people when you barely know what you’re doing! And unfortunately, a lot of jobs require about one and a half people and lots of patience. There’s one person doing most of the work, while the second person is bored just holding or checking something. But it’d be really difficult to do anything without that person holding or checking!

All in all though, it was a productive day, or at least a day that set us up to have a really productive day later. 😛

Next up:

  • cutting and adding in the missing blocking
  • finishing the bolt hole and attaching the post
  • making a perfect rafter to use as a template
  • putting up the ridge board
  • making a couple dozen rafters
  • bracing the frame so it’s 100% square when the plywood goes up
  • cutting and putting up plywood!

I have all the plywood planned out, and one thing I had to research was how to close the gap between the top of the wall and the top of the rafters because I have a 6″ overhang. A lot of buildings have to leave a gap for ventilation, which I don’t need because I’m using spray foam. Other buildings don’t show what they’ve done. Many tiny houses don’t have an overhang at all. It was difficult to find information on. One suggestion was to fill the gaps with blocking, but that would mean I’d have to buy 2x6s or even 2x8s to fill the 5.5″ gap plus the angle. Then there’s the question of whether or not to notch out your plywood to fit up between the rafters to fill that space. My plan so far is to notch my plywood, then decide if I need some size blocking for support. If I decide to leave the ends of the rafters exposed, then I’ll have a flat surface to continue my siding onto between the rafters, and if I decide to cover the bottom of the rafters, then the plywood will stop the spray foam from getting into the sealed off overhang.

Notes: Nail guns are heavy, the more ladders the better, and metal takes ages to drill into! Also, I’m a regular at the building supply store now.

Thanks for the help and patience, lovelies, and remember, I’m making it up as I go along!

Wall Raising!

My walls are up and I’m thrilled! Everything went very smoothly, all the holes for the rods lined up no problem, and it only took about an hour to get them raised with six of us.

Thank you to Dylan, Dan, Natasha, Mum, and my helpful neighbour 🙂 It’s not all squared up yet, but I’m so excited with how it looks and feels when you’re standing inside 🙂 Now, instead of a sad, flat trailer, I get to see this everyday!

Previous Older Entries

Quotes

"It takes as much energy to wish as it does to plan." - Eleanor Roosevelt

"It is not because things are difficult that we do not dare. It is because we do not dare that they are difficult." - Seneca

"Have nothing in your house that you do not know to be useful or believe to be beautiful." - William Morris