The End

As I was finishing up the bulk of the siding in mid-June, I should’ve been reading up on electrical and starting to buy materials for the interior. But I wasn’t. I told myself I was just focusing on finishing the exterior, and then I’d get to that. Then I told myself it was okay to take some time to enjoy my summer. That it was okay if the build took longer so long as I was enjoying my life.

There are so many reasons the build has taken as long as it has, and I can’t change the past. But I do have (some) control over my future, and I no longer imagine the tiny house in it. Somewhere along the line, the picture changed, and I hit a wall with the tiny house.

I have put all of the time and money into the tiny house that I’m willing to, and now it’s time to move on. I waited to write this post, because I wanted to be sure and because I had to figure out what I wanted to say.

I learned so much building The Lilac. I learned how to find information, teach myself, practice, work with my hands, manage large amounts of money, work hard, and be assertive. But I don’t feel the need to become an expert on electrical and plumbing, I don’t want to spend more time building, and I’m certainly not going to pay someone else. The tiny house is fully paid off, and I have no interest in going back into debt for it. I’d need thousands more for electrical, plumbing, insulation, flooring, interior siding, appliances, not to mention the time I’d spend building furniture and cabinets. I’m going to take a break from building for a while. I’ve had my fill for now.

When I first came across tiny houses, I was 16, and you could build one for less than $20,000 (I’ve spent that much on just the exterior). My plan was to build a tiny house in a year, maybe two, then pick a school, move the tiny house nearby, pay a small amount of rent, and live in it for at least four years while I went through university. I’d save money and I’d have my own custom-designed, private space. I could continue to live in the tiny house until I didn’t want to anymore, then I could keep it in the backyard of a bigger house and use it as an office or guest house.

But it’s already been over two years, and I’d need at least another year to finish the interior. I haven’t had the freedom or privacy of my own space this entire time, so it’s gotten to the point where it’s not worth it for me to continue. Tiny houses are still a legal grey area as well, so I wouldn’t have as much flexibility as I want either. I couldn’t live in a city, or close to town because the bylaws are stricter. I want to be able to live close to conveniences, and I want to be able to sell everything I own and go travel or live abroad. I can’t do that easily if I have a tiny house that needs a parking spot and rent paid.

I bought a nicer car, I make good money working six nights a week at a restaurant, and I moved into an apartment within walking distance of my job. I have a bedroom with a little balcony off it, I have my own kitchen and bathroom that I don’t have to share, and I finally have my own living/dining/office space that’s not two feet from my bed. The bedroom door has purple glass panels in it (oh how I love unique details) and the rent’s not too expensive. I have the freedom, flexibility, and privacy that I wanted.

Now I’m taking my free time and money back, and I’m moving on.

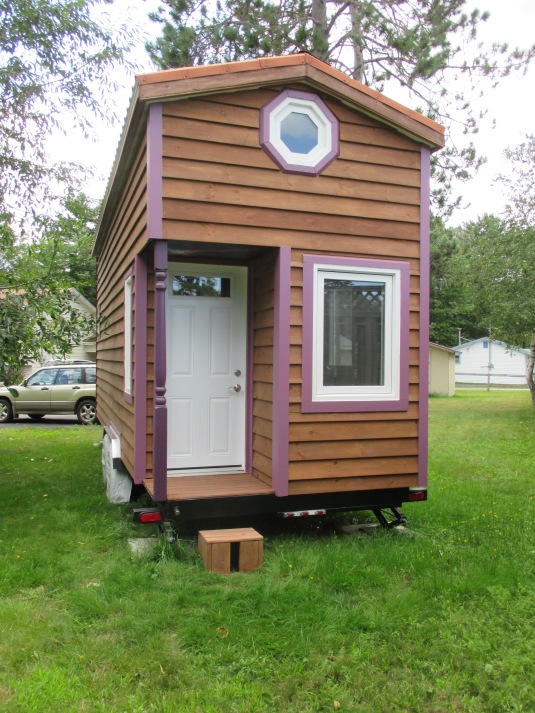
The tiny house was good for me, it gave me purpose when I needed it, but now it’s time to sell the shell. Anyone interested in buying a tiny house shell on wheels to finish can contact me through my About Me page.

P.S. Before I made any decisions, I was included in a tiny housers graphic that came out today! You can see it here.

P.P.S. I did finally get stamped drawings from the engineer, and it cost me $632.50.


Thanks for following along with me on this journey. ❤


Name Reveal

Take a look at The Lilac:

IMG_1405

Every cottage and small home that is well loved has a name, and so I’ve named my tiny house The Lilac. The home I grew up in had a lilac bush in the yard, and my mum would sometimes bring in the flowers for the dining room table. The scent of lilacs remind me of home. ❤ They’re purple too!

To finish up the exterior, I built a front step:

I finally got around to scraping off all the window stickers:

And I added a couple little blocks of trim around the porch floor:

Also, my boots have taken a beating…

Now I’m onto electrical! Wish me luck!

As the Dream Grows

Sure, building this house is taking me a while, but I love it. I’ve learned and grown with it. Take a look at what I’ve been up to over the past two years (hours include my work and help from others):

2015

May 29th: Trailer arrives!

June 3rd: Insulation

June 10th-June 30th: Subfloor (82 hours)

~Waiting, consulting with the engineer~

August 14th-15th: First wall

~More back and forth with the engineer~

August 28th-Sept. 7th: Building the walls (50 hours)

Sept. 12th: Wall raising day! (11 hours)

Sept. 23rd-Sept. 25th: Adding blocking (31 hours)

Oct. 8th-Nov. 16th: Wall sheathing & cutting rafters (46.5 hours)

Nov. 19th: Moving the house into storage

~Winter & research~

2016

May 1st-6th: Sanding the loft beams (6 hours)

May 7th: Moving the house out of storage!

May 13th: Sleeping loft beams go up (8.5 hours)

May 15th-May 26th: Rafters & ridge board (21 hours)

May 28th-June 10th: Upper sheathing, storage loft beams, & fascia boards (60 hours)

June 11th-June 17th: Roof sheathing (37.5 hours)

June 26th: Collar ties (13.5 hours)

July 10th-July 23rd: Blocking, drip edge, ice + water shield, & fixing collar ties (22 hours)

August 4th-August 7th: Installed skylights! (4.5 hours)

August 21st-August 28th: Roofing! (23.5 hours)

Sept. 17th: Moving the tiny house

Sept. 25th-Oct. 6th: House wrap (18 hours)

Oct. 2nd: Fixing collar ties again, adding brackets (13 hours)

Oct. 7th-Oct. 15th: Door install! (23 hours)

Oct. 13th: Finishing roofing (6 hours)

Oct. 20th-Nov. 2nd: Windows! (17 hours)

Nov. 7th-Dec. 6th: Staining fascia & siding (59 hours)

Dec. 10th-Dec. 20th: Siding prep. & soffits (12.5 hours)

2017

Jan. 21st-Jan. 29th: Soffits (13 hours)

Feb. 5th-May 18th: Cutting, priming, painting, & putting up all trim (75 hours)

April 23rd-May 8th: Porch (17 hours)

May 12th-May 14th: Siding prep. (9 hours)

May 19th-June ?: Siding! (49 hours so far)

Here’s a peek of the siding:

20170531_153809[1]

Isn’t it cute! I love this little corner. 🙂

Stay tuned for more siding pictures!


Mini Porch

My porch floor is finished! It’s so pretty and new that I don’t want to step on it with my dirty work boots!

It’s taken a lot of little steps to get the porch done. I covered most of the work in my last post, but I still spent six hours today working on it, as well as several hours throughout the week. I did a third coat of paint on the post. I primed and spray painted the porch and the back of the trailer (after sanding away a few spots of rust).

The porch has so many weird little corners that I needed to figure out. First off, the side wall sheathing was installed while the plywood porch was in place, so when I took the plywood out, I had a 5/8″ gap to deal with. I was planning on notching the porch boards to fit, but then I realized gluing in a strip of plywood would be way easier. I decided to paint it purple, so in the gaps between the porch boards, you would see a little colour.

I glued in the piece, then I thought I should caulk it as well, so no water can get stuck behind the piece.

20170507_153545

No more purple, oh well.

I spent a while fiddling with the boards to get them just right.

20170507_141456

Test fit!

I marked them, then predrilled, countersank, and set the screws partway in.

The edge of metal on the right side of the porch was simply not wide enough to accommodate the thick screws for drilling into the trailer, so I used some heavy duty adhesive. The first piece is almost completely underneath the threshold of the door, so that piece doesn’t have any screws in it:

20170507_165417

First piece down!

I didn’t want to put any screws into the flange (the 3 1/2″ on the left) where they’d be exposed, and besides, the wiring for the trailer lights runs underneath there. So that’s why there are no screws on the left.

After that I glued down the next five pieces and clamped them. Then I used the impact driver and burned through some screws and an hour or two. Drilling into metal is not fun! But it’s done! Oh and one screw unfortunately lined up exactly with some c-channel underneath, so it couldn’t tighten up and had to be glued in.

I shimmed the threshold because it was just a little higher than the decking:

20170507_190209

Then some caulking and it was finished!

20170507_202622

🙂

The boards are spanning three feet and bowed a little when you stepped on them, so the green screws in the center are for some support pieces underneath. My sis helped me with those. 🙂

My porch floor is done, so now I can get the trim up around the door and on those corners, and get the siding going!

20170507_204410

I’ll get some less fuzzy pictures soon. 😛

20170507_204450

P.S. I bought a third caulking gun, and it works amazingly. It is fifty times easier to use than the others I’ve used. I caulked around the octagon before I bought the new gun, and I was switching back and forth between two half-broken ones. With the new one, it took less than 20 minutes to caulk and tool one window, when before it was taking over an hour! I easily finished the last two windows, as well as around the wheel wells. 🙂

20170505_141159

$5, $10.50, & $13.50, respectively.

The porch ceiling will be the last exterior piece to go up. Trim and siding first!

It’s been a great week. I’ve been picking away at little to-do’s like priming and painting the plywood edges to protect them. I put together my porch! I’ve been researching HRVs and HVACs, as well as fans and vent hoods. I also did some 3D modeling of my future furniture, and it’s looking good!

It was pouring rain last night, so I went out and laid in my loft for a while, smiling in my little house that I built, listening to the rain, protected. I need to do something about the rain loudly hitting the wheel wells though…

And today was T-shirt weather! I had the windows in the tiny house open. 🙂 Cheers to warm weather!

Winter Blues

I realized I didn’t publish any posts in February. I’ve been picking away at tasks, barely. I cut all of the exterior trim, and started priming, but my morale has been low. I’ve been having a hard time doing anything on the house. It’s hard, doing this alone. I work six days a week. And there’s always tomorrow… Tomorrow I’ll make time, tomorrow I’ll get up early, tomorrow I’ll feel excited about the build again. But I have hit the low before the final stretch. There’s still so much work to do and not a lot of reward yet.

The weather warmed up a bit, but I got sick with another cold and then a stomach bug. 😦 Last night we got a little snow storm, but it’s back up to positive temps and the snow is melting away again. It’s been a weird, windy winter. Time is ticking away for my exposed house wrap, but it’s looking like I’ll get that covered mid-April. It should be covered by the end of March, but that’s not going to happen and then I’m going away for 10 days.

In January, I finished cutting and put up the soffits. In February, I cut all 50 pieces of trim for the exterior, for the corners and around the windows and wheel wells. I started priming, and after being sick, I’m back to priming. I’ve got a great little filtering mask that really helps with the smell, and I don’t have to worry about the weather thanks to the heated garage. 🙂 Soon I’ll be on to the purple paint, and I plan to have the trim up before I leave for my trip! When I get back I’ll be getting the siding on (finally) and then it’s on to interior work (finally).

Here’s what I’ve been up to:

Previous Older Entries

Quotes

"It takes as much energy to wish as it does to plan." - Eleanor Roosevelt

"It is not because things are difficult that we do not dare. It is because we do not dare that they are difficult." - Seneca

"Have nothing in your house that you do not know to be useful or believe to be beautiful." - William Morris