Name Reveal

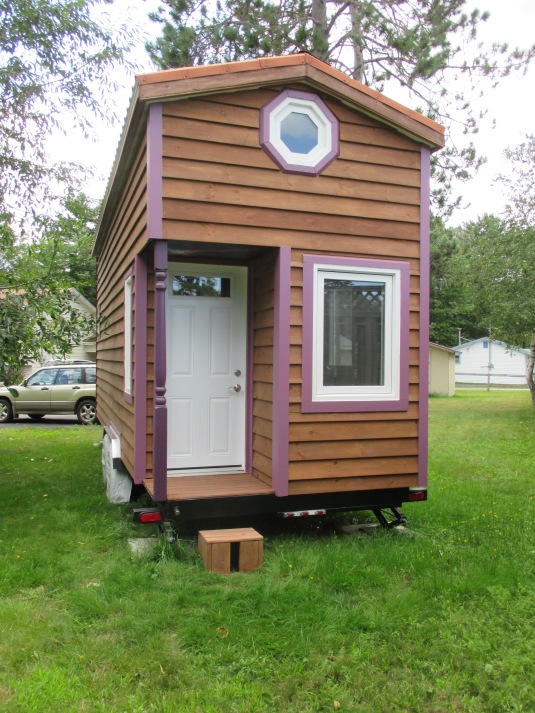
Take a look at The Lilac:

IMG_1405

Every cottage and small home that is well loved has a name, and so I’ve named my tiny house The Lilac. The home I grew up in had a lilac bush in the yard, and my mum would sometimes bring in the flowers for the dining room table. The scent of lilacs remind me of home. ❤ They’re purple too!

To finish up the exterior, I built a front step:

I finally got around to scraping off all the window stickers:

And I added a couple little blocks of trim around the porch floor:

Also, my boots have taken a beating…

Now I’m onto electrical! Wish me luck!

Holey House!

I said it was going to be a busy month! I ended up working six days a week for most of August. However, I was offered better shifts at the restaurant, which allowed me to quit my second job at the convenience store! So from here on, hopefully my life will be a little less hectic! In addition to that, I moved out of Dylan’s parents’ house. It was time.

And speaking of time, I felt like I didn’t have enough! After working six days a week, mostly nights, I was not jumping out of bed at 6am on Sunday morning to work on the house. Doing this build myself does give me flexibility and control over when and how long I build, which can be bad when I’m procrastinating, but it can be good when I need a bit more sleep. I do what I can. It’s nice to have a build day where I get up at a decent hour then build until dark, but I’ve also felt very accomplished sneaking in a few hours in the morning or early afternoon before a shift. Then there are other times when I take too long in the morning and run out of time to get anything done before my shift.

I’ve worked on the house six days so far this month, and have one more day planned before the 1st. I leave on a road trip with my sister September 1st! We’re driving to drop her off at university in Ontario, and then I’m spending a week visiting friends and family. I am so excited and I definitely need this vacation!

But before I leave, I have to catch you up with what I’ve done! I think the pictures will say it all:

IMG_1172

I cut out the skylight holes, doing my first plunge cut!

20160804_182206

My jigsaw guy  ❤

20160804_182343

20160804_182957

20160804_183242

IMG_1178

20160804_183142

While I was working on the roof, Dylan was busy cutting out all the downstairs windows!

IMG_1174

IMG_1175

IMG_1179

I added a skylight!

IMG_1180

IMG_1185

IMG_1186

IMG_1181

One skylight in, one to go

IMG_1182

IMG_1189

Ooh look another one!

IMG_1190

😀

20160821_160711

Ooh look, pretty roofing! Spanish tile inspired, 3D orange shingles made with recycled materials 🙂

IMG_1200

Ignore my twisty fascia, it’s on the to-do list to fix 😛 The ridges give the house a unique shadow 🙂

IMG_1201

IMG_1202.JPG

Laying it out to test it. Before nailing these down, we taped the foam closure strips to the bottom of the shingles so they’d end up in the right place. The solid foam will keep bugs and little creatures from crawling in.

IMG_1203

Finishing up the first row!

IMG_1206

Dylan worked on the first row from the ladder, and I worked on the second row up on the roof 🙂

IMG_1208

Third row started and flashing kit installed (the kit took two hours on its own)

IMG_1209.JPG

I can’t decide if it looks unreal or too real 😛

IMG_1210.JPG

First row on the other side and the second skylight kit installed – only took an hour this time. 🙂

IMG_1213

TA-DA!

IMG_1216

The silver is tape, and will be covered by the ridge cap I have to add.

IMG_1218

IMG_1220

I’m just proud we didn’t put any pieces upside down!

It might not have been the unrealistically productive month I planned, but skylights and roofing are two big milestones, and they look amazing! I still have to put the verge and ridge caps on, but then it’s done! And we’ll see what September brings. 🙂

What They Don’t Tell You

After I finished the roof sheathing, I needed to switch to research before starting the next steps. I had several days off, but ended up spending them on the computer.

(If you’re just here for the story, not the technical stuff, you can skim the next several paragraphs).

Skylights:
I researched how to install skylights and read the instructions that came with them, which all seemed pretty simple. I could cut my rough openings, line up the skylights, nail them down, put the sticky flashing around them, and then work on other things. The casing they come with can be put back on until I’m ready to put on the metal pieces of the flashing kits, around the same time as the roofing.

Weather-proofing:
I researched ice and water shield, and found amazing things about Grace ice and water shield and how other products don’t compare. I checked, the kind I have is not Grace brand. Then I researched Tyvek (the “best”) vs. Typar (what I bought). Tyvek seemed a lot better too! So I started calling hardware stores to check prices. I might as well use the best materials since I’m building such a small structure. But how can you know which brands make a difference and which ones are pretty much the same? Apparently Tyvek and Typar are similar and are almost the same price, so I stopped worrying about that. As for Grace ice and water shield, it’s $160 a roll! I only need one roll, but still, that’s 3x more expensive than what I picked up. The man I was talking to asked if a building inspector was making me use it, so I guess it’s not generally used, and the stuff I have is supposed to be as good. We’ll see.

Drip edges??
While I was reading about installing ice and water, I discovered drip edges and started Googling again. That was quite the rabbit hole, involving arguments on forums and people correcting people correcting other people. Finally I decided that I wouldn’t install gutters, unless it became apparent that I needed them down the road, but a drip edge would save my fascia, and should be installed underneath the ice and water at the eaves. But that was the point that people disagreed about, with some saying the drip edge should be installed on top, with an added skinny strip of I&W. That doesn’t make sense to me because that’s not a “water-shedding lap” like I kept reading about. You have to think like water, and about gravity, but also about where water might sneak backwards or up. So I might put a strip of ice and water underneath the drip edge in case any water finds its way up underneath, then install the drip edge, then roll out the I&W overtop. I still need to figure out exactly how to integrate the metal flashing of the skylight with the I&W, but all the videos show cutting back any underlayment before installing. I’m going to put the skylights up first, rather than putting on the I&W then trying to cut through it later to install the skylights.

House wrap:
House wrap seems pretty straight forward. You just tack it up with staples and you’re done, right? Well, what about the edges?? And as I was looking up how to install house wrap, every video – including a tiny houser I follow – recommended using plastic-capped nails instead of staples. The point of house wrap is seal the house from any water that gets behind your siding, which will happen, while still allowing your house to breathe (which doesn’t matter in my case with spray foam, I need an air circulation system). So, how is house wrap supposed to do its job when you’re poking thousands of holes in it, in pairs, with staples? Using the exposed side of the garage as an example, there are only 3 staples that are still securing the house wrap, while there are at least 10 others that have ripped through the house wrap. Knowing this, I couldn’t buy the $20 pack of staples and get to work. So I decided to wait on the house wrap until I could get the special nails.

It’s all this crap that they don’t tell you about. I didn’t even know drip edges existed until last week. Workshops and tiny house construction videos will talk about things like house wrap and siding, but they rarely mention how to do edges, corners, or things like weatherproofing the ceiling of the covered porch or underneath the eaves!

So, armed with my new knowledge, and some things I already knew, I made several trips to different hardware stores. I…

  • returned some glue and nails I didn’t need (got back $32)
  • bought wood to frame the skylights
  • bought wood to use for blocking in the roof
  • bought more galvanized nails to nail into the blocking
  • bought some plastic siding to cut up and use to cover underneath the overhang
  • bought some wood strips to use underneath the front and back overhangs
  • bought drip edges
  • ordered some custom bent metal to use as drip edges for the wheel wells
  • bought the expensive plastic capped nails ($100 a box!)

All while working 9 days out of 10, so I haven’t had much of a chance to build, unfortunately. I’ve fallen a bit behind in my plan for the summer months, but I expected that after the skylight issue. It’s also been pouring rain, which sucks, because I had planned to have the ice and water shield on by now, but that’s how it goes, and the inside of the house is dry at least. I’m back to work for the next 6 days, so we’ll see what I can squeeze in until my Saturday off.
 

Skylight Update

I have my new skylights! Phew. I got an email on Thursday saying they were in, but didn’t have time to pick them up before work. Then Friday was Canada Day so everything was closed. So this morning, with the too-big skylights in the back, I went straight to the hardware store, even forgetting to eat breakfast. The window guy gave me a sheet with the skylights and flashing kits listed and the total price, which was over $1400! I asked him how much each item was, thinking in my head that there was no way they could be this expensive. I only paid $1264 for the first set of skylights! I did get a discount on those because they were so late, but even still, the new skylights were 12″ smaller! He looked up the prices and dropped the price of the big one for me by $35, and made the flashing kits $20 cheaper each, bringing the total to $1345. I didn’t fight him anymore on that. He always looks cranky when he sees me now, which I think is unprofessional, but since it was my mistake this time choosing the bigger skylights, I wasn’t going to argue more about the price. I went into the store willing to pay a restocking fee or pay for the ripped boxes or whatever it took so long as I left with the right skylights – and they didn’t say anything about the boxes. I had been looking forward to the new ones being cheaper, but I guess nothing ever is. 😛 And I did save myself $75 just by asking (which goes to show how much they can manipulate prices). But anyways, here they are!

IMG_1169

$80 more expensive yet way smaller, but oh well.

Skylight Stress

You can’t make detailed plans too far ahead with building projects, because things are constantly changing. You plan to do one thing, but don’t have something for it and the hardware store is closed, so you do something else instead. Things take longer, and you don’t always have extra people around to help. Things don’t go as you expected. But if you don’t make plans and deadlines, you won’t get anything done!

For the beginning of June, I had a list of things to do, and a rough outline of what I would do on each of my days off for two weeks. I didn’t plan the whole month though, because I knew plans would change too much by then. But by the time I finished that list and the middle of the month rolled around, I was busy with other parts of my life. I went zip-lining, hung out in my hammock reading, caught up with friends, spent time with my dad who’s home from Ottawa, and spent a day hiking and swimming with a friend at a local waterfall. 😀 It’s finally summer! 😀

I also needed to do some research after finishing the sheathing. New steps = learning as I go. I researched how to install skylights, ice and water shield, drip edges, house wrap, and more. You could spend forever reading forums of carpenters arguing about the correct way to do something and there’s no clear answer. Dylan’s also been working more now that it’s summer, so I often don’t have his help during the day.

After he got home from work one day, I was ready to work on the house and get my skylights installed, which seemed like the next step. Better to seal up the roof as soon as possible, while the walls could wait. So I got up in the loft to measure to cut the rough opening for my first skylight, and discovered that it would take up almost the entire width of the ceiling! When I ordered the skylights, I was more focused on getting my custom little windows all sorted out, and simply picked the middle size of 3 standard size skylights. It technically could fit, but I am not going to cut a hole in my roof that big. The way it is, yes the width of the roof is big enough on the top, but when you take away the overhang, the width of the wall, and the ridge board, you get less than 2″ on the top and bottom of the skylight. (Never mind that the instructions say to leave 24″ on the top and bottom of a skylight, which would be entirely impossible on my roof.) To frame it and trim it properly, to flash it and fit the roofing around it… there’s just not enough space. This was a horrible realization on the day I had planned to install the skylights, and worse because it was minutes after the hardware store had closed, so I couldn’t even call about returning them.

Discouraged, I didn’t bother trying to get anything else done on the house, and anxiously waited until morning thinking about the skylight boxes I’d ripped to get the instructions out.

The next morning, Dylan and I loaded the skylights and matching flashing kits into the car and went to the hardware store. They are stock sizes, so they should be returnable, but I was stressing that they were going to tell me no. It was my mistake this time, not theirs. Could nothing go right with the windows?!?!

I walked up to the window guy and clearly stated what I wanted. At first he hesitated, saying that he couldn’t really send them back to Ontario, but I insisted that they’re stock windows, that I needed to return them and get the smaller size, and that I wanted them next week. He said he’d call up the place to see if the flashing kits would be usable with smaller skylights, and told me he would give me a call later in the day. I told him, “I’ll wait.” So he called right away and ordered new skylights and new flashing kits. He told me they’d be in in 3-5 days and that I could return the other skylights then. It wasn’t as difficult as I’d expected, but I still walked away worrying that he’d screw me over when the new ones arrived by refusing to take the old ones with ripped boxes.

Since then, I’ve been busy working and attending my sister’s high school graduation! And of course, it’s been raining.

To be continued…

Previous Older Entries

Quotes

"It takes as much energy to wish as it does to plan." - Eleanor Roosevelt

"It is not because things are difficult that we do not dare. It is because we do not dare that they are difficult." - Seneca

"Have nothing in your house that you do not know to be useful or believe to be beautiful." - William Morris