Hi lovelies, I’m back again! It seems that the blog is not as high on my priority list as it once was… Truthfully, I just really prefer to write a post about one step when it is fully completed. Building isn’t that neat though. Tasks are constantly dragging on and overlapping. I don’t get to neatly finish one aspect of the house. At this point, multiple tasks require my attention and time simultaneously. I’m always balancing, doing a bit here, getting behind there, then switching to something else, and so on.
The other difficulty is that I never feel like I have time to write. If it’s daylight, I feel I should be outside working on the tiny house, and if it’s nighttime, then I should be researching or working in the garage. And if I did work on the house all day, then I’m too tired to stay up and blog.
I’m going to try to post more often, with simple updates, rather than lengthy posts about the past month and a half, but that’s what this is! Look, purple paint!

Victorian Plum!

I painted this with a cheap brush and it looks terrible…

So I bought a paint roller!

Yay pretty! And so easy to use.

First coat

This is the 2nd coat with the roller, over the 1st coat with a paint brush.

The center two have a second coat of paint.

Top piece has 3 coats, bottom piece only has 2.

3 coats done!

Checking the colour in sunlight. Still icy!
I wasn’t happy with the coverage, even after three coats, so I decided to do a fourth coat.
It took me 25 and a half hours to do one coat of primer with cheap brushes (which were recommended to me for primer because it can wreck your brushes). Then it only took me 15 hours to do four coats of paint with a roller! Priming and painting does get a little monotonous, but I took my laptop out to the garage, and listening to a show on Netflix kept me from getting bored. 🙂 I primed for nine hours one day!
My dad was home for a week in March, and was able to help me with the corner trim pieces and a couple of windows. 🙂

First window!

It goes a lot faster if you get all the screws set first.

We screwed the short corner trim above the porch together before putting it up, to make sure the visible bottom edges were perfectly lined up.

Corner trim!

🙂

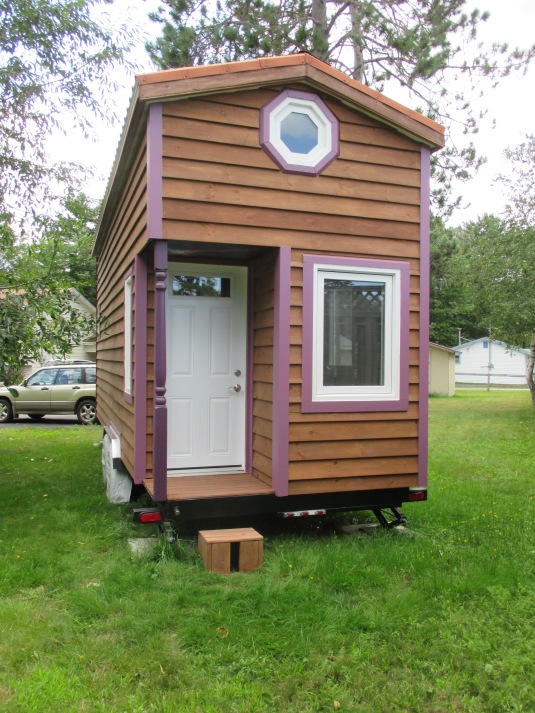
Entrance window 🙂
That’s all we had time for before he went back to Ottawa, but my mum kindly helped me put up the trim for three more windows! 🙂

A countersink bit, a bit to predrill, and a robertson bit for the screws.

First I predrilled all the pieces.

Then used the countersink bit so I could wood fill over the screws later.

Third step: set the screws partway in. I used coated decking screws.

Kitchen window!

Main room window, and you can see straight through to the entrance window.

There were still icicles!

My window seat window 🙂
Then I went on a trip to Toronto! I got to visit some of my favourite people, including my sis, and I got to celebrate her 19th birthday with her! 🙂 The following weekend I was away, and after that was my 21st birthday, then halfway through April I finally had time to get the tools out again.
When Dad and I put up the three corners, I realized my measuring had been a bit off. Because of the angles were the trim meets the roof overhang, the side wall corner trim pieces were about a quarter inch longer than the end wall pieces. I decided to put them up anyway, to be trimmed later with the jigsaw, and that’s exactly what I did:

First, jigsaw the corners to length.

Then prime and paint (x4). Ignore the tearout; I’m not particular enough with the chop saw yet. 😛
A quick 15 minute touch-up several days in a row, and done!
Next was the tricky octagon. I wasn’t quite sure how well I could get 8 pieces to line up. I sanded the end grain a little, because the roughness was keeping the pieces from fitting tightly together. Then I predrilled, countersank, and set the screws, and got out the ladder. I ended up using Tuck Tape to get the pieces exactly where I needed them, and it held until I got the pieces screwed down. 🙂

Taped up!

Done!
I also put up the trim around the wheel wells, now that there isn’t snow sitting on them.
I purposely cut all my trim to leave about an 1/8″ gap around the windows. Another tiny house builder left a small gap as well, and it seemed better than having anything tight together. Flexing, expansion, draining – these all seemed like good reasons to have a little space. Add primer and four coats of paint to both ends of a piece, and that gap ends up bigger than planned. But I wasn’t about to delay putting the trim up so I could trim the ends a little, then have to prime and repaint them. I was also wondering whether or not to caulk the gap, so that made the decision. I bought white, paintable, permanently flexible caulk. I chose to caulk the top of the trim as well, so any water that gets behind the siding won’t get behind the trim.
I was then reminded of how much I hate caulking. It’s such a pain, and a mess, and uncooperative. I only got three out of six windows done in one day. The tube said not to tool (as in smoothing it out, usually with your finger), so I did the top of the trim on five windows and the wheel wells without tooling, because that will be hidden by the siding. But it doesn’t look great and I ended up tooling around the windows. It’s still not super tidy, but I’m going to paint the edge along the trim.

You can see the gaps between the house wrap and the trim.

Fixed! This is the first bit of caulking that I did, and it’s also the nicest.

Bead, no tooling.

Scraped. I was wasting a lot of caulking, just because I needed a bead big enough to fill the gap.

I tried using the flat end of a pencil, rather than pushing the caulking in too much with my finger. I ended up just using my finger for the last window.

Cleaned up the vinyl with mineral spirits.

It doesn’t look bad if you’re not looking for it. 🙂
I still have eight pieces of trim to put up, but I can only do that after the porch floor is finished. And I can’t finish the porch floor until I paint the post. And it keeps raining!
I bought some decking that was frozen together because it was “all they had”, then had to exchange the pieces when the ice melted and the inner sides were black. I also had to go back for an extra piece of decking. So many trips to the hardware store!
I cut the decking, sanded it all, stained it all, and drove to a specialty store for the right screws. I also had to cut, prime, and paint a little strip of plywood to take the place of the old temporary porch floor (which I had to cut out). I cut and primed a piece for the ceiling as well, and bought some little trim for around the porch post.

😦

What I’ve been using to build a porch!

Haven’t seen this in a while!

Going to sand, prime, and spray paint this black before the boards go on.

My trusty old porch.

Little bit of water damage around the edges.

The beginnings!

Cut and spaced!

Sanding!

A couple of support peices for underneath.

Left – what I used for the subfloor. Right – what I bought for the porch decking. I’ll have to predrill the wood, but the decking is thicker so I need the extra threads.

Half stained.

Finished! I love the grain!
I brought in some of the lighter purple paint to the hardware store, and they darkened it for free. 🙂 I primed the post, then did two coats of paint. I think I’ll do a third. The door will eventually be this colour as well. 🙂

Little can of Victorian Plum

Darker?

Tried the roller, used this crappy brush for the first coat, then went out and bought a nice brush. Isn’t the colour lovely though!?

Beautiful!
I think that just about catches you up to now. I wanted to have the siding up by the end of April, but then little things kept adding up on my list of “Before Siding”. The house wrap isn’t showing any signs of wear, and I’m doing the best I can to get everything done!
Oh, and the first half of the house is completely paid off! I am debt free, for now!
Now I just have to figure out air circulation, heating, cooling, plumbing, electrical…